Purchase Order Management
Creating POs, statuses, supplier actions, receiving, and how it ties to inventory
This page covers creating and working with purchase orders end-to-end: required fields, status lifecycle, supplier communication, receiving, and how updates affect inventory and replenishment.
Creating a purchase order
Required information
- Supplier (who fulfills the order)
- Destination / warehouse
- Currency
- Line items — products, quantities, costs (and tax where configured)
- Status — usually Draft until you send or confirm
Estimated arrival is derived from supplier lead time and your dates where applicable; you can adjust before sending.
Optional fields
- Reference / invoice number (also editable from the PO list)
- Payment terms and due date
- Note to supplier
- Shipping carrier and tracking number
- Tags for filtering on the list
Adding lines
- Choose variants from inventory / catalog flows in the Create PO experience.
- Set quantities and unit cost (tax as needed).
- Add cost lines (e.g. freight) when the modal supports it.
Order statuses (same badges as the list)
The PO Status field uses the same badges you see on the Purchase order display:
- Draft — work in progress.
- Ordered — sent to supplier; awaiting shipment.
- Shipped — in transit.
- Delivered — received at destination (subject to your receiving workflow).
- Canceled — will not be fulfilled. (The UI uses Canceled; Cancelled is accepted where matching is needed.)
Payment vs PO status
Payment is tracked separately. On the list, Paid / Unpaid / Payment overdue use the payment badges:
Supplier communication
Where enabled:
- Open More options (or equivalent) on the PO.
- Choose Email supplier (or similar).
- The app can generate a PDF and/or portal link and send via email.
Exact labels depend on your build; the goal is to share the PO outside Inventory Mate without retyping lines.
Receiving inventory
- Open the PO (from the list or a direct link).
- Choose Receive inventory / Receive when stock arrives (non-draft orders in read-only view).
- Enter Qty received and Qty rejected per line, then Save.
The in-app copy matches what you see below: received quantities flow to Shopify on-hand at the PO destination; rejected is recorded on the PO for your notes only and does not change Shopify incoming or open PO quantity.
Qty received updates your Shopify inventory when you save. Qty rejected is stored on this PO for your records only and does not change Shopify.
Line table (Receive Inventory mode)
Summary
- Qty received — Applied to Shopify inventory at save (for the additional amounts you enter in this session), using the PO’s destination location. Also reduces incoming and open PO exposure by the received amount.
- Qty rejected — Saved on the purchase order line for your records only. While the PO stays open, rejected units do not reduce incoming, open PO quantity, or suggested restock exposure — the system still treats ordered minus received as on the way until the PO is closed or quantities are adjusted.
Saving a receive session updates Shopify on-hand for received quantities and reduces incoming and open PO by what was received only. Rejected counts stay on the PO for documentation.
Optional: automatic weighted average cost at receipt
In Shop defaults → PO defaults, you can turn on Automatic cost price sync at receipt. When enabled, Inventory Mate can update Shopify variant unit cost using a perpetual WAC blend of live on-hand at the PO destination and this receipt (PO line cost × received delta), before quantities are applied. Saving a receive always opens a confirmation with per-line formula help (your actual numbers)—see PO receipt — weighted average cost sync to Shopify.
Partial receipts
- Record only what arrived; remaining quantity stays open on the PO until fully received or adjusted.
- Line totals and PO status should follow your rules (e.g. toward Delivered when complete).
Shopify incoming quantity sync
Every time you create, edit, receive, or delete a purchase order, Inventory Mate updates Shopify's Incoming quantity for those products automatically. Your team in Shopify Admin always sees how much stock is on the way — no manual updates needed.
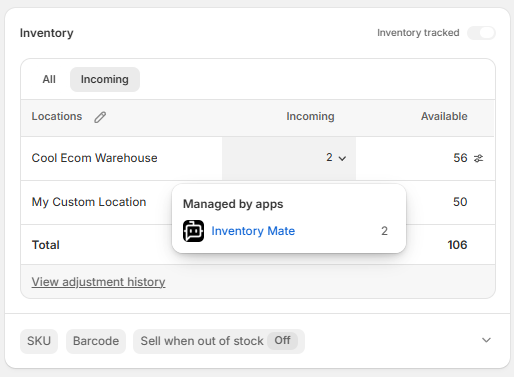
What Shopify shows
- The Incoming number at each location reflects your total open PO quantity for that product — what you ordered minus anything already received (rejected qty on the PO is notes only and does not reduce incoming).
- Hovering the incoming row in Shopify Admin shows "Managed by apps → Inventory Mate" so anyone on your team knows where the number comes from.
The incoming quantity in Shopify always matches the Open PO column you see on the Stock Replenishment screen — they use the same numbers.
Which POs count
Only committed, inbound orders count toward incoming: Ordered, Shipped, and Partially received. Draft, Delivered, and Canceled POs are excluded.
When Shopify updates
Shopify incoming updates automatically whenever you:
| You do this | Shopify incoming changes |
|---|---|
| Create a PO | Goes up for each product at the destination |
| Change a quantity or add a product | Adjusts to match the new total |
| Remove a product from the PO | Reduces for that product |
| Move the PO to a different location | Old location goes down, new location goes up |
| Receive some or all of the order | Reduces by what was received (rejected qty does not reduce incoming) |
| Delete a PO | Reduces to reflect your remaining open orders |
If something looks off
Incoming in Shopify recalculates from your full PO data on every save, so the next time you edit or receive a PO the number will self-correct. If you need to correct it without making a PO change, contact support.
After save: inventory & replenishment
When PO lines or status change, downstream systems typically:
- Recompute open PO exposure per SKU/location.
- Refresh suggested restock / joins used on the replenishment screen (depending on sync and API).
See Suggested restock for how targets and On Order status interact.
Duplicate and delete
- Duplicate — creates a new PO (often Draft), copying lines; tracking and receipt state are not carried over as-is.
- Delete — usually restricted to Draft or policy-allowed states; removing a PO updates open PO quantities used in replenishment.
Best practices
- Move Ordered → Shipped → Delivered as real events happen so arrival and reporting stay accurate.
- Keep tracking and estimated arrival current to reduce false overdue signals on the list.
- Align payment terms with due dates so Payment overdue reflects reality.
Related: SKU COGS and cost in Shopify
- SKU COGS & weighted average cost — Date-range blended WAC in the report, push rules, and tradeoffs vs live Shopify cost.
- PO receipt — weighted average cost sync to Shopify — Optional perpetual WAC at receive (live on-hand × old cost + receipt × PO line cost), written to Shopify before quantities update, with always-on confirmation and per-line formula help.